Picture
It is not often that I start to make something with no idea of what it will end up being but when I began this recipe all I really knew was I was in the mood for black beans, the recipe had to be glutenfree and I was having a house full of guests the next day for a casual barbeque. Fortunately my son took one look and said “oh great, you made Cowboy Salsa!” Well, alright then, Cowboy Salsa it is!

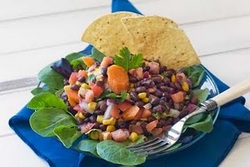
Whatever it is called, it is so tasty and really couldn’t be easier. I started with a package of Hurst Family Harvest Black Chipotle Lime Black Bean soup mix; it contains nothing but dried black beans and natural flavorings, and then added some corn, diced tomatoes, red onion, cilantro, lime juice and just a smidgeon of olive oil. I also added some spicy pickled carrots for heat. You can find the carrots in the Latin section of some grocery stores or Mexican markets, if you can’t find them, just leave them out and maybe throw in some pickled jalapeno if you like your food on the spicy side. The fact that the beans contained a  gluten-free flavoring packet already just made the dish even easier.

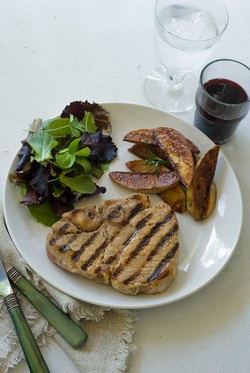
While my family preferred just scooping it up with some gluten-free corn tortillas, this Cowboy Salsa is just as tasty as a side salad and really good topped with a piece of grilled fish or chicken.

Start this recipe the night before you plan to serve it.

Cowboy Salsa

Ingredients

1 package Hurst Family Harvest Chipotle Lime Black Bean soup mix
1 red onion, diced
2 tomatoes, seeded and diced
2 cups frozen corn kernels, thawed
1 – 14 ounce can sliced pickled carrots, drained (optional)
1 bunch cilantro, roughly chopped
Juice of 2 limes
¼ cup olive oil
Kosher salt & pepper to taste

Directions

Rinse and sort beans, reserve the flavor pack. Place the beans in a large pot and cover with 2 inches of warm water. Allow the beans to soak overnight or at least 4 hours. Drain the water from the beans and fill the pot with fresh water, at least 8 cups. Add the flavor packet, cover the pot and bring to a boil. Reduce heat to a simmer and let beans cook for 1 ½ to 2 hours or until the beans are tender. Drain beans.

Combine the cooked beans with the remaining ingredients and refrigerate for at least 2 hours.

Serves 8 – 10 gluten-free people.

Want to know more about your favorite Gluten Free Recipe or how to avoid being bothered by Celiac with our range of Gluten Free Recipes which are made from Gluten Free raw material feel free to visit us at: http://www.simplygluten-free.com

Article Source:http://simplygluten-free.com/blog/2011/06/cowboy-salsa.html

 
Picture
I remember once going into a beautiful, expensive restaurant in California with some really good friends almost giddy with the anticipation of having a delicious meal and some great wine with the fabulous company. I hadn’t checked out the restaurant ahead of time and it turned out there were only two main dishes on the menu that were gluten-free, one was fish and the was other a pork chop dish. I was leery of ordering the pork chop but the waitress assured me their chops were juicy and flavorful so I went for it. It arrived looking gorgeous; thick, glossy and promising succulence.

Unfortunately, like a Hollywood set facade, the beauty was deceptive. It was dry and flavorless and the fact that it was huge made it seem even worse as now there was just way too much of not-a-good-thing.

As I have mentioned before, the secret to making moist, flavorful pork chops is brining. For a simple explanation of why brining is the answer you can take a look at this post. Or you can just take my word for it!

Pork and maple have a natural affinity for each other which makes brining chops with maple a pretty brilliant idea. Personally, I love the flavor of maple but I have two problems with it. First is that it sends my blood sugar on a chaotic roller coaster ride with a few moments of bliss followed by sinking into a deep sugar coma. The second is that when it is cooked it seems to me to have a bitter, almost metallic, after-taste. Some people don’t get that with maple but for some reason I am pretty sensitive to it. So instead of using pure maple syrup for my pork chops I use Maple Flavored Organic Blue Agave Nectar from Wholesome Sweeteners. It tastes like maple but it is agave, all that wonderful maple flavor without the wild ride!

I like to use those great big, bone-in, center-cut pork chops but this recipe will work just as well with those cheap, skimpy little things you find on sale, just adjust the cooking time.

If you have time, make your brine in the morning, let the chops hang out in the fridge while you are at work and when you get home you can grill them up in less than 15 minutes. You can brine the chops anywhere from 1 to 12 hours but no more than 12.

If you have dreams of the perfect pork chop, try this recipe. You can thank me later.

Ingredients

1 cup plus 2 tablespoons Maple Flavored Agave Nectar, use divided
1 cup kosher salt
¾ cup Sucanat or sugar
3 tablespoons plus 1 teaspoon Dijon mustard, use divided
2 tablespoon fresh rosemary, minced
1 teaspoon black pepper
6 cups water 2 cups ice
4 center-cut loin pork chops (approximately 1 inch thick)
olive oil for brushing the chops

Directions

Combine 1 cup Maple Flavored Agave Nectar, salt, Sucanat or sugar, 3 tablespoons Dijon mustard, rosemary and black pepper with the water in a saucepan. Bring to a boil, stirring to dissolve the sugar and salt. Take off the heat, stir in the ice. Pour the brining liquid into a large plastic storage bag or into a glass baking dish deep enough to hold the chops. Add the chops and refrigerate for between 1 and 12 hours.

Heat a grill pan or skillet over medium heat until hot. Combine the remaining 2 tablespoons Maple Flavored Agave Nectar with the remaining teaspoon of Dijon mustard.

Remove the chops for the brining liquid, rinse with cold water and pat dry. Sprinkle some black pepper on each side of the chops and brush with oil.  Place the chops on the hot pan and cook 4 – 5 minutes per side depending on the thickness of the chops. Brush the cooked chops with the Maple Flavored Agave Nectar/Dijon Mustard sauce. Let the chops rest for 5 minutes and serve.

Serve 4
glutenfree people.

Want to know more about your favorite Gluten Free Recipe; with our range of Gluten Free Recipes which are made from Gluten Free raw material feel free to visit us at: http://www.simplygluten-free.com

Article Source : http://simplygluten-free.com/blog/2011/06/maple-brined-pork-chops.html

 
Picture

While my husband was outside making fire, fighting off mosquitoes the size of hummingbirds and being a he-man at the barbeque today, I was in the house doing “the woman’s work” of making side dishes and dessert for Memorial Day.

I know I should be offended by this concept that my hubby is the only one in the family capable of manning the grill but let me tell you a secret, I would so rather stay inside, nice and cool, bug-free and look like I am working hard, taking lots of credit when in fact nothing could be further from the truth. I am all about simple with lots of “WOW” factor.

Take this cool and refreshing  dessert, just the thing after a heavy meal. It is a glutenfree, dairy-free, honey panna cotta. It seems fancy-schmancy, but in fact, it takes just a few minutes of active work and the rest of the time, the fridge does all the work for you!

In this recipe the honey is not only the sweetener but the flavoring agent so it is important to use good honey – I used Fair Trade Organic Amber Honey from Wholesome Sweeteners. I also used almond milk but you can use any kind of milk you like. Topped with a handful of sweet/tart berries and another drizzle of honey, this dessert is a symphony of tastes and textures.

OK, off to make myself look tired (I am going to have to work at it, I’ve been loafing all day!) and then to accept kudos for my lovely dessert. Can we keep just how easy it was to ourselves?  Thanks!

Honey Panna Cotta Recipe

Ingredients

3 tablespoons water
1 packet (2.5 ounces) unflavored gelatin
2 cups almond milk
1/3 cup honey plus more for serving
Pinch of kosher or fine sea salt
1 pint berries
6 mint springs for garnish, optional

Directions

In a small bowl, stir together the water and gelatin and let sit for 5 minutes. Meanwhile put the almond milk, honey and salt in a medium saucepan and bring just to a boil over medium-high heat. Microwave the gelatin for 10 second on high power and stir into the milk/honey mixture.

Lightly oil six 4 ounce ramekins and then ladle the milk/honey mixture into them. Refrigerate until cold and firm, about 4 hours.

To un-mold, run a sharp knife around the edge of each ramekin and place in a bowl of very warm water for 10 – 15 seconds. Place a plate on top of the ramekin and invert. Scatter some berries around the panna cotta and drizzle with some additional honey.

Serves 6 glutenfree people.

Want to know more about your favorite Gluten Free Recipe; with our range of Gluten Free Recipes which are made from Gluten Free raw material feel free to visit us at: http://www.simplygluten-free.com

Article Source : http://simplygluten-free.com/blog/2011/05/gluten-free-honey-panna-cotta.html


Picture
I have been accused of being a glutenfree food shopaholic. I won’t mention the person’s name but let me just say this – I am married to him.

While I might agree that 25 cans of anchovy fillets in the pantry is a tad extreme, I do not agree that the 15 jars of piri-piri sauce I brought home from Africa was unnecessary, after all I don’t know when I will be returning to Africa. Now, maybe the hubby has a point that I should actually USE some of that piri-piri sauce and not just save it because I am worried I won’t be able to purchase more. Maybe.

An architect friend of ours once did a little survey of my cupboards and such, in an attempt to help us find more storage space. He mentioned that I had enough food, cosmetics and shoes to survive a nuclear holocaust. I felt very proud! After all, if in deed we do suffer a nuclear holocaust who wants to go hungry, look haggard, or run around barefoot? Funny thing is he didn’t say it like it was “good” thing.

So the other day when I was off to the grocery store again (the third time that day) my husband says to me “why don’t you use up the food you have on hand first?” I patiently explained to him that he should be happy (and not snippy) about the amount of food in my freezer and pantry because with what I have on hand I could make a lovely dinner. And, in half an hour. So there!

Well, a challenge was thrown down – he would randomly pick some ingredients, I would cook it and if he liked it, I won. Kind of like that show Chopped where the chefs get a basket of random food and have to make a dish in a time limit, except there is no $5,000.00 prize. (What I win is still in question, maybe it is a trip to Paris – Oh!  The glorious food markets they have there…) OK, game on!

He picked some chicken thighs, a jar of BAKER Naturals Peach Pie Filling , made by SOLO Foods (which I like because of the fact there is no high fructose corn syrup in it, it is gluten-free and because I like to save the jars – but that’s another story) and a green pepper. The green pepper was a bit of a cheat in my opinion because he doesn’t like green peppers, but I was not deterred.

I added some onion, a red pepper, some garlic, gluten-free soy sauce, crushed red pepper and fresh lemon juice and made a lovely skillet dish of savory peach chicken. I even tossed in some brown rice and an arugula salad just to show off a bit. It was ready in half an hour and he loved it! (Maybe there was a little stack of green peppers left on his plate at the end of the meal, but still…)

So I think I have proved my point – a well stocked pantry is the key to making dinner quickly. And with a little imagination you can change around the use of ingredients (like turning peach pie filling into a chicken dish) and come up with something new and delicious! Maybe next time I make this recipe I will toss in a little piri-piri sauce.

Savory Peach Chicken

Ingredients

2 tablespoons olive oil
6 boneless, skinless chicken thighs
salt and pepper
1 medium onion, diced
1 green pepper, chopped
1 red pepper, chopped
2 cloves garlic, mined
1 – 26 ounce jar BAKER Natural Peach Pie Filling
1 tablespoon gluten-free soy sauce
½ teaspoon crushed red pepper (more or less depending on how spicy you want it)
Juice of 1 lemon

Directions

Heat a large skillet over medium-high heat. Add the olive oil and heat. Season the chicken with some salt and pepper and brown in the hot oil, about 3 or 4 minutes per side. Remove the chicken to a plate, add the onion and peppers and cook until they start to brown and soften, about 5 minutes. Add the garlic and cook for 30 seconds.
Add the peach pie filling, soy sauce, crushed red pepper and stir to combine. Add the chicken along with any juices that have accumulated on the plate, cover the skillet, turn heat down to medium and cook until the chicken is cooked through, about 10 minutes.
Add the lemon juice, stir and serve.
Makes 6 glutenfreeRecipes servings.

Article Source : http://simplygluten-free.com/blog/2011/06/gluten-free-savory-peach-chicken-skillet-dinner.html


Picture
Many soy products contain “soy isolate”. It’s what makes soy unhealthy.

Soy Isolate is a product derived from separating or isolating the protein from the soy bean. In theory this sounds good but on the contrary, the method by which soy isolate is processed and manufactured involves acid washing it in aluminum tanks. As a result, it contains large amounts of aluminum. In addition, nitrites and chemical flavorings are often used to add flavor to the finished product.

According to the American Dietetic Association, soy isolate contains anti-nutrients that can actually delay your body’s ability to digest food and absorb nutrients, a problem those of us with Celiac Disease or gluten intolerance deal with anyway.

Whole Soy contains all the good which soy has to offer (loads of non-animal protein, fiber and omega 3 polyunsaturated fatty acids. It can lower cholesterol and is rich in bone-building calcium, zinc, magnesium and iron) without any of the bad stuff of soy isolate.

SOYJOY nutrition bars are made with WHOLE SOY, not soy isolate.

SOYJOY nutrition bars contain no trans fats or hydrogenated oils, no artificial colors or flavors and  glutenfree. What they do contain is nutritious whole soy, real fruit and a whole lot of yummy flavor!


Picture
Apparently there is some really fine print in my marriage contract that says the barbeque is the strict domain of the husband and that the side dishes are my responsibility. This is fine by me; let the hubby stand over the grill, working up a sweat, acting all manly, while I work away in the house where there is air conditioning and no bugs. And when I say work, what I really mean is toss together a few things, let the flavors come together in the fridge while I read a book or something. I like to keep it simple but not make it look like I did so.

This Asian coleslaw is not only super easy but allergy-friendly as well; it is glutenfree, dairy-free and thanks to Sunbutter, nut-free. Since it doesn’t contain any mayonnaise it is great for eating outdoors.

So whether you are manning the grill or “slaving away” over the side dishes this Memorial Day, I wish you a fun and safe holiday!


Asian Cole Slaw

Ingredients

3 tablespoons Creamy Sunbutter
6 tablespoons grapeseed (or other neutral tasting) oil
½ teaspoon sesame oil
¼ cup rice vinegar
1 tablespoon honey
2 teaspoons gluten-free, wheat free soy sauce
1 – 1 pound bag tri-color coleslaw mix (or 4 cups shredder cabbage and ½ cup shredded carrots)
Kosher or fine sea salt & pepper
2 green onions, finely sliced
1 teaspoon sesame seeds

Directions

In a large mixing bowl combine the Sunbutter, grapeseed oil, rice vinegar, honey and soy sauce, whisk together until smooth. Add the coleslaw mix and toss to combine. Taste and adjust seasoning with salt and pepper if needed. Refrigerate until serving time, up to 4 hours. Garnish with sliced green onions and sesame seeds.

Makes 6 glutenfreeRecipe servings.

Article Source: http://simplygluten-free.com/blog/2011/05/gluten-free-nut-free-asian-coleslaw.html